
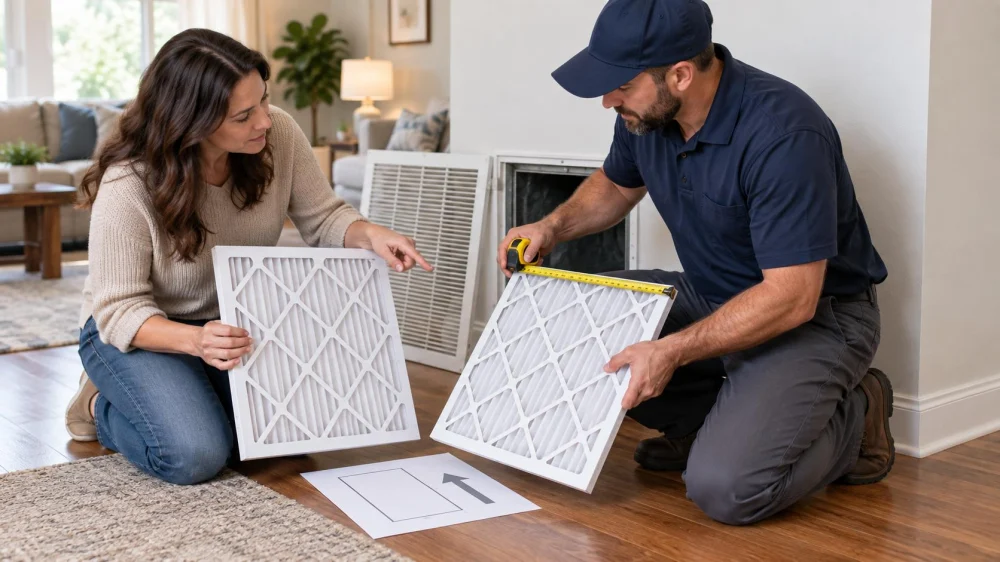
AC Filter Size Check: Labels, Fit, and Replacement Record
On this page
- Quick answer
- Find the correct filter location
- Understand nominal and actual size
- Match type and airflow needs
- Replace the filter safely
- Check the fit without modifying equipment
- Choose a condition-based schedule
- Keep a simple filter record
- Know when to call a professional
- Limits and important notes
- Frequently asked questions
- Sources and evidence notes
- Conclusion and next steps
Quick answer
To choose an AC filter, use the size and type specified by the equipment or filter cabinet, then verify the old filter's nominal label and actual dimensions. Turn the system off before opening an accessible filter slot. Match airflow direction, seat the filter without bending or gaps, and close the cover fully. Do not assume a higher efficiency rating is automatically better; confirm airflow compatibility with the manufacturer or HVAC professional. Record the filter, date, and condition.

Find the correct filter location
Filters may be in a return grille, wall or ceiling cabinet, air-handler rack, furnace slot, or a separate media cabinet. Some systems have more than one return, while others use one central filter. Installing extra filters can restrict airflow.
Use the equipment manual or ask a technician to identify every required location. Do not open sealed equipment panels or reach near moving parts, sharp metal, wiring, or wet components.
Anderson's Heat & Air Of N.E.A
1014 Highland Ave, Newport, AR 72112, USA
Understand nominal and actual size
A nominal size is a convenient category and may not equal the filter's precise physical dimensions. Two products with the same nominal description can differ enough to fit poorly in a tight cabinet.
Read the cabinet label and manual first, then compare the old filter's dimensions. Measure length, width, and depth only if needed, using the same order consistently. Never force an oversized filter or leave large bypass gaps around an undersized one.
Match type and airflow needs
Filter media, depth, pleat design, frame, and efficiency affect resistance as well as particle capture. A rating that sounds better may exceed what the blower and duct system can support, especially when the filter loads with dust.
Ask the manufacturer or qualified technician which range is compatible with the installed system and household needs. Medical air-quality goals may require a broader ventilation or filtration plan rather than a filter swap alone.
Replace the filter safely
- Turn the system off at the normal control and wait for the blower to stop.
- Protect floors and have a bag ready for the old filter.
- Note the airflow arrow before removal.
- Slide the old filter out without shaking dust.
- Insert the new filter with its airflow arrow pointing toward the blower or as the cabinet directs.
- Close and secure the grille or cover before restarting.
Check the fit without modifying equipment
The filter should sit in its designed guides, remain flat, and allow the cover to latch. A little movement may be normal, but air should not have an obvious path around the media.
Do not tape over access panels, cut the cabinet, stack filters, trim the frame, or improvise spacers that can be drawn into equipment. Ask a technician to correct a damaged rack, missing door, or unusual gap.
Choose a condition-based schedule
Replacement timing depends on filter type, runtime, season, pets, construction dust, smoke, occupancy, and manufacturer guidance. A fixed monthly rule may be too frequent for one home and too slow for another.
Check at a consistent interval without assuming colour alone measures performance. Record pressure information only if the system has a designed indicator or a professional measures it.
Keep a simple filter record
- Equipment or return location.
- Nominal and actual size.
- Filter type and efficiency rating.
- Airflow-arrow direction.
- Installation and inspection dates.
- Observed dust, odour, moisture, noise, or damage.
- Any technician recommendation or system change.
A photo of the package and installed orientation can prevent future guesswork, but keep personal or service account information out of shared images.
Know when to call a professional
Arrange service if the filter collapses, becomes wet or oily, rapidly clogs, will not fit, or is accompanied by poor airflow, ice, burning odour, repeated shutdowns, unusual noise, visible contamination, or water. Turn cooling off for dangerous symptoms and follow emergency guidance.
A filter change cannot diagnose duct restrictions, blower problems, refrigerant issues, moisture sources, or indoor air-quality hazards.
Limits and important notes
This is general US homeowner guidance, not equipment-specific service advice. Manuals, cabinet labels, manufacturer requirements, building conditions, and a qualified HVAC professional govern the correct filter and procedure.
Do not work on live electrical parts, open refrigerant circuits, disturb suspect asbestos or mould, or bypass safety switches. People with respiratory conditions should seek appropriate clinical and indoor-air guidance.
Frequently asked questions
Can I use the old filter's printed size?
It is a useful clue, but confirm it against the cabinet or manual and actual fit because nominal dimensions can differ.
Which way should the arrow point?
It normally follows airflow toward the blower, but use the cabinet marking or technician guidance for the specific location.
Is the highest available rating best?
Not automatically. The system must maintain required airflow as the filter loads, so use an approved range.
Sources and evidence notes
This article applies general residential HVAC filtration, airflow, equipment-access, maintenance-record, and safety principles. The equipment manual, filter cabinet, manufacturer, qualified technician, and current indoor-air guidance determine a specific home's requirements.
Conclusion and next steps
Locate the designed filter position and photograph the existing orientation. Confirm nominal and actual size plus an approved filter type before buying replacements. Install with the system off, verify the cover closes, and record the date so the next inspection is based on evidence.


 Paschal Air, Plumbing & Electric4.0 (12 reviews)
 Anderson's Heat & Air Of N.E.A5.0 (1 reviews)
 Indoor Comfort Team4.0 (568 reviews)
 AZS Heating & Cooling4.0 (36 reviews)
 Vitt Heating & Cooling4.0 (1005 reviews)
 Level 9 Heating, Cooling, and Plumbing4.0 (470 reviews)
 AC Service Invoice: Model, Parts, and Warranty Records
 AC Filter Size Check: Labels, Fit, and Replacement Record
 AC After a Power Outage: Check Before Restarting
 AC Outdoor Unit Clearance: Observe Before You Trim
 AC Warranty Claim: Gather Records Before You Call
 One Room Stays Warm With AC On: Checks Before Service